Showing posts with label Born Pretty. Show all posts

Friday, October 24, 2014

[Nail Art] Chevron Floral


Hi everyone! :) Today I have a short nail art post for you. I started this mani with something much simpler and sweeter in mind, but I went a little crazy with the water decals. Now it's a bit more flamboyant. LOL. Hope you still like it. :)


What I Used
China Glaze In A Lily Bit
Milani Black Swift


Wednesday, September 3, 2014

[Nail Art] Gold Shells and Gemstones


Summer's coming to an end, so I've been clinging to the last few days with summery manis like this one. The nail art is beach inspired with subtle stamping and pretty charms. I was totally smitten with this one! Hope you like it as much as I do. :)

[Haul] MoYou London + Born Pretty Store


Hi guys! I just wanted to share with you all the nail art stuff I recently purchased. Particularly my new stamping plates. I've collected a few since my renewed interest in stamping. The only one not pictured is my DRK Nails plate, which you can read about here. Also not shown are my Cheeky plates, but I'll review that in a separate post. Now, onto the good stuff!


First up is my BPS haul! I bought these myself, so they weren't sent to me for review. I got the following in my order (all affiliate links): Rose water decals 70-72, Cartoon decals 88-90, Cat and Dog decals, Horse and Bird decals 262, Badtz Maru decals, Pony stamping plate, 3mm & 5mm gold sea shell charms, silver bow charms #2.


A close-up at the stamping plate and nail charms. Do you remember the gold bow charms I reviewed in this post? I loved them so much that I also got them in silver. I already did some nail art with the gold shells, so you'll be seeing them again soon. :)

Next is MoYou London!

Wednesday, August 6, 2014

[Nail Art] DRK Nails Designer 2 Stamping Plate


Hey guys! I have two different nail art designs for you today. For both looks, I used the Designer 2 plate from DRK Nails. I first saw this plate on Lacquer Lockdown, where Tamira did this gorgeous look with it. I was going to buy Designer 1 too, but ended up only getting D2. So far I love it! 


My first attempt at advanced stamping. ^^ I accidentally smooshed my pinky at the last minute while transferring it to my nail. T__T One day I will master this!


What I Used
Nicole by OPI Sweet Surrender (base)
Zoya Marney (deep plum; superb for stamping)
Zoya Chanelle (warm brown, colored portion)
Pretty Jelly Shy Girl (pink holo, colored circle)
silver holo pigment


Using a different image from the same stamping plate, I created this second look. The stamping's more subtle since the pink is so bright. This is the same pink I used in my Refreshing Cherry Mani. I've been wearing it a lot this summer.


What I Used
Milani Hot Pink Rage
Milani 3D (gold holo base)
Color Club Cherubic (stamping)
BPS BOP 100-103 Water Decals*
DRK Nails Designer 2 plate


I haven't tried all the images from this plate yet, but the etchings are deep and stamp well - even for a noob like me. I had no problems with the plate, and it arrived very quickly. I got it 4 days after I placed my order. The price is not too bad either. $6.50 for the plate and $2.53 for shipping. If you're interested, I would definitely recommend this plate. :)

♥ Liz

Thursday, July 24, 2014

[Nail Art] Refreshing Cherry Mani with BPS Bow Charm


Hi everyone! I'm back again with a sweet and simple mani today. I was in the mood for some cute nail art, but didn't want to spend too much time on it. This one's great for beginners, because it doesn't use many tools either.

Thursday, May 8, 2014

[OOTD & NOTD] Something Blue ♥

Press Sample Affiliate Link

I've always wanted to do a 'How I Wore It' type of post with my nails, so here's my first go at it. It's a little different, but I hope you like it. :)


First, the nails! I wanted something light like white without the starkness, so I ended up using an off white. This is 3 coats of Nicole by OPI Sweet Surrender*, which is a pretty blush-toned cream. It's almost white but with a hint of pink, which makes it a more flattering alternative on me.

Thursday, May 1, 2014

[NOTD] Pretty In Pink with BPS Pearls


Hi guys! I've itching to do nail art, but haven't had much time to sit down and do it. So I settled on a easy mani using pearls, rhinestones, and glitter. It's understated, but doesn't leave my nails feeling too plain. :)


For this look, I started out with 4 coats of Nicole by OPI I'll Have The Salmon. It's a pretty peachy-pink with fine silver shimmer. It's sheer, and applies a little unevenly. However, it does dry quickly so 4 coats didn't take too long. It does look okay at 3 coats, but I prefer it at 4.

The glitter topper is Milani Sugar Burst, which I love! It's filled with multi-shaped matte pink glitter and small holo glitters. I didn't want too much on my nail, so I used about half a coat to a nail.


For my accent nail, I used a silver rhinestone from a wheel I bought on Ebay. The tiny, 1.5mm pearls are from Born Pretty Store. Aren't they cute? The quality is very nice, as is the finish. I have other half pearls (also from Ebay), but they look much more fake. The BPS ones have a subtle satin sheen to them that makes them look a million times nicer. You can find them here for $2.99 a wheel. If you buy these, don't forget to use my code F10X31 to receive 10% off your entire order. :)

That's it for today! I'll be back with more nail art soon. ^^

♥ Liz

Thursday, February 20, 2014

Born Pretty Store Gold Diamond Stud Review


Hi guys! Today I tested out these 4mm pyramid studs* from BPS. Since it's so big, I decided to keep the rest of the nails a plain color. I think these would be great for a one night event, but I don't think they'll hold up any longer than that on my nails. I have small, curved nails, so none of the sides touch my nail. Pairing them with other smaller studs and beads around the sides might help them stay on though.

Personally, they are a little too big for my taste. If BPS carried these in 2mm sizes, they'd be perfect! Because I really love how these look. I'm thinking of using these to decorate my phone. Something like this would be super cute!


If you like how these studs look, you can purchase them here for $1.99/10pcs. Be sure to use my coupon code F10X31 to receive 10% off your entire order! :)

Liz

Wednesday, January 22, 2014

[Nail Art] Foxy Valentine


Hi guys! I can't believe Valentine's day merchandise was already up in stores this year as soon as Christmas ended! Now that it's actually getting closer, I decided to partake in some cutesy nail art. Nothing too pink or red (yet), just some super amazingly adorable fox nail art. ;)


Polishes Used
Fox | Milani Colorful Coral (new 2014)
White details | Milani White (new 2014)
Black details | Milani Black Swift
Middle + Pinky | China Glaze Kinetic Candy


As expected, the Milani cremes were excellent for nail art due to their high opacity and easy-to-work-with formula. Isn't the coral color just perfect for the fox? Oh, and if you're wondering what "Chu♥" means, it denotes a kissing sound in Korean. Like "mwah" in English. I think it was made popular by Kpop group f(x).

If you're wondering what I used for all the drawings, it's this BPS brush set*! I can't recommend this set enough. It's my favorite from BPS so far, because the brushes give you so much control. I had no problem getting every detail exactly where I wanted. The tips are small and pointed, so you can get some pretty precise lines.

As always, you can use my code F10X31 to get 10% off your order. :)


What do you think? Are you a fan of Vday nail art? :)

♡ Liz

Wednesday, January 15, 2014

[Nail Art] Painterly Stars


Today's look was inspired by the blue details in my last nail art look. I love how well Milani Blue Zoom and Aqua Brisk mixes together, so I expanded that look onto the full nail. I also added in some gold accents to pull the whole look together.

What I Used
Milani Blue Zoom
Milani Aqua Brisk
China Glaze Mingle With Kringle (gold accent)
Born Pretty Store gold star studs*


To get this look, I started out by painting my nails with 2 coats of Blue Zoom. Once it was dry, I added a drop of Blue Zoom and Aqua Brisk next to each other on a piece of paper. After lightly swirling the colors together, I used rough brush strokes to create the mixed effect. I finished off the look, by adding light strokes of gold to complement the gold studs and accents.

By the way, these gold star studs are the same as the neon ones I used here. These are much more versatile since they're gold. They also hold up well to acetone - so yay for recycling. :) If you're interested in purchasing them, use my code F10X31 to receive 10% off your order.


What do you think? Is this a look you would wear?

Liz

Monday, January 13, 2014

[Nail Art] Neon Starburst with BPS Studs


Hi guys! I haven't done a nail art post in a long while, so this post is going to fix that. :]

Sunday, September 22, 2013

Neon Fun with BPS Studs!


Hi guys!  Today I have two nail art looks featuring neon studs from Born Pretty Store.  I think one was a fail, but I'm happy with how the other one turned out.  Let's start with the fail...lol. :P


For this look, I used Color Club Wicker Park as my main base color and OPI DS Pewter for my accent color.  Then I stamped on the word collages on my pointer and middle nail in grey and silver respectively.  Unfortunately, that did not show up at all, especially on the middle nail. -.- I also tried to do something artsy with silver holographic foil, which just looks silver here due to the light box.  I think it was kind of okay at this point, but then I decided to add the purple studs... And then I didn't like it.  LOL!  Oh well, so of course I had to try again with the studs.


This time I went for a very simplistic, clean look.  Best part is, no skills were involved!  So if you're new to nail art, this is a good way to jazz up your nails.  For my base, I used Zoya Sailor.  Then I simply added these 2mm round purple studs* and 4mm square pink studs*.  Wouldn't this be a nice transitional mani into fall?  Especially for those of you still trying to hang on to summer. :3  Me?  I love fall. ^__^

If you're wondering about the quality of these studs, I found that none of them bled with top coat - which is a big plus.  They're also pretty flat, so they'll definitely stay on your nails until you're ready to take them off.  Usually with studs, people ask me if they're reusable.  For these, I'm going to say no.  You may be able to reuse them if you use them lightly or with a light base color - where clean up will be gentle.  However, if you try to soak these in acetone, the color will chip off.  I saw this happen with the pink studs, but the purple ones handled acetone better.


Overall, I'm super in love with these studs.  BPS has a lot more colors in both neon and pastel shades.  I think it'd be really cute to use a bunch of different colors for a colorful mani. :D  If you plan on getting any of these studs, be sure to use this code to receive 10% off your order: F10X31.

Are you a fan of colorful studs?  Let me know in the comments! :]

PS>> I'm now on Instagram, so come say hi!  It's lonely over there!  You can follow me too. x)

Liz

Monday, July 29, 2013

Born Pretty Store Review: Sticker Decals, Foil & Chains (Picture Heavy)


Hey guys!  Today's post is jam packed with pictures, so be prepared!  I have several different nail art looks to show you.  I think you'll like them. :)


This first look was done with embossed gold nail decals*.  These are stickers and they actually have really good staying power.  Just make sure the edges are down and cover with top coat.  Once you do that, these won't budge or peel off on you.  I think it gives your mani an elegant touch and it only takes seconds to do.  Here I'm wearing it on my tips over Butter London Sunbaker.


Friday, April 5, 2013

Super Bling Mani with Born Pretty Store Products


Happy Friday!  I'm so happy it's sunny most of the time now.  Which is perfect because today's mani looks much better in the sun. ^^


I think my stamping is getting better, although the middle nail didn't turn out as well.  Here's what I used to get this look. :)

Tuesday, February 19, 2013

Born Pretty Store Review: Bow & Stamping Plate


Hi guys!  I finally did it!  I did my first fairly successful stamping mani.  If you've been following me for a while, you'll know that I did one other stamping mani before.  I'm not going to link it, because it was pretty disastrous.  Anyway, I could never get the hang of it and I kind of gave up.  I decided I was doomed to forever freehand my nail art.  But then I saw this cute stamping plate from Born Pretty Store, so I decided to give it another go. :)

Thursday, January 24, 2013

The Tale of Two Nail Looks

Hey all!  I have two nail art looks for you today.  Both are fairly minimalistic.  I was originally going to do a Valentine's Day manicure, but ended up going in a whole new direction.  The result is the look shown below.  It kind of has a tattoo vibe to it because 98% of the designs were done with a needle (needle marbling tutorial here).  Do you like my tattered heart?  I think the sheer beige base I used is perfect for this design because it adds a bit of delicateness.  It reminds me of tattoo tights.


Saturday, January 5, 2013

Born Pretty 11pc Water Decal Review


I finally did it!  I built a lightbox.  Hooray~  Honestly, I don't know why I put it off so long.  It wasn't very hard to make and didn't cost as much as I thought it would either.  Most of the materials I already had at home, so I only had to buy the bulbs and the lamp clamps (from Home Depot).  The lamps were around $7 each and the bulbs were about $3 for a pack of 4.  If you're looking to build one for yourself, this is the tutorial I used. 

And yes, new camera as well.  It came three days ago, and I've been tinkering with it since.  I think my pictures will be a mix of photos taken with both the new and old camera.  I'm a first time DSLR user, so sometimes the pictures don't come out the way I want them to. T__T  But the lightbox does make a difference.  I think my point and shoot pictures look better with the lightbox (see nail pics below).

Anyway, on to the review!  I got these 11pc water decals from Born Pretty Store.  I actually got 2 different sets, so you're looking at 22 pieces here.


I mainly got these because I was interested in these cutesier designs (shown above).  The one on the left is the decal I'm wearing on my nails below.


I cut the nail decal into little triangles to apply them to my nails.  You use these like any other water decal: soak them in warm water for a few seconds, then slide the nail decal off the backing by rubbing it gently towards the side.  The only downside with these is that you have to cut them into the shape you want.  I did triangles, since they're the easiest to do.  If you want to be more creative, you could probably do half moons or stripes.


Verdict: Overall, these were easy to use and offered quick nail art.  They do have a sticker-like quality to them, but other than that, I think they add a nice touch to simple nails.

Availability: The design I used can be found in this set of water decals: 11pcs Colorful Stripe Spot Nail Water Stickers Nail Art Decals.  And the other set can be bought here: 11pcs Pretty Nail Water Stickers Nail Art Decals Manicure Flower.  Don't forget to use my code F10X31 to receive 10% off! :)


Liz
This post contains affiliate links.
These products were sent to me by BPS for my honest review.
Please view my disclosure policy for more info.

Wednesday, November 14, 2012

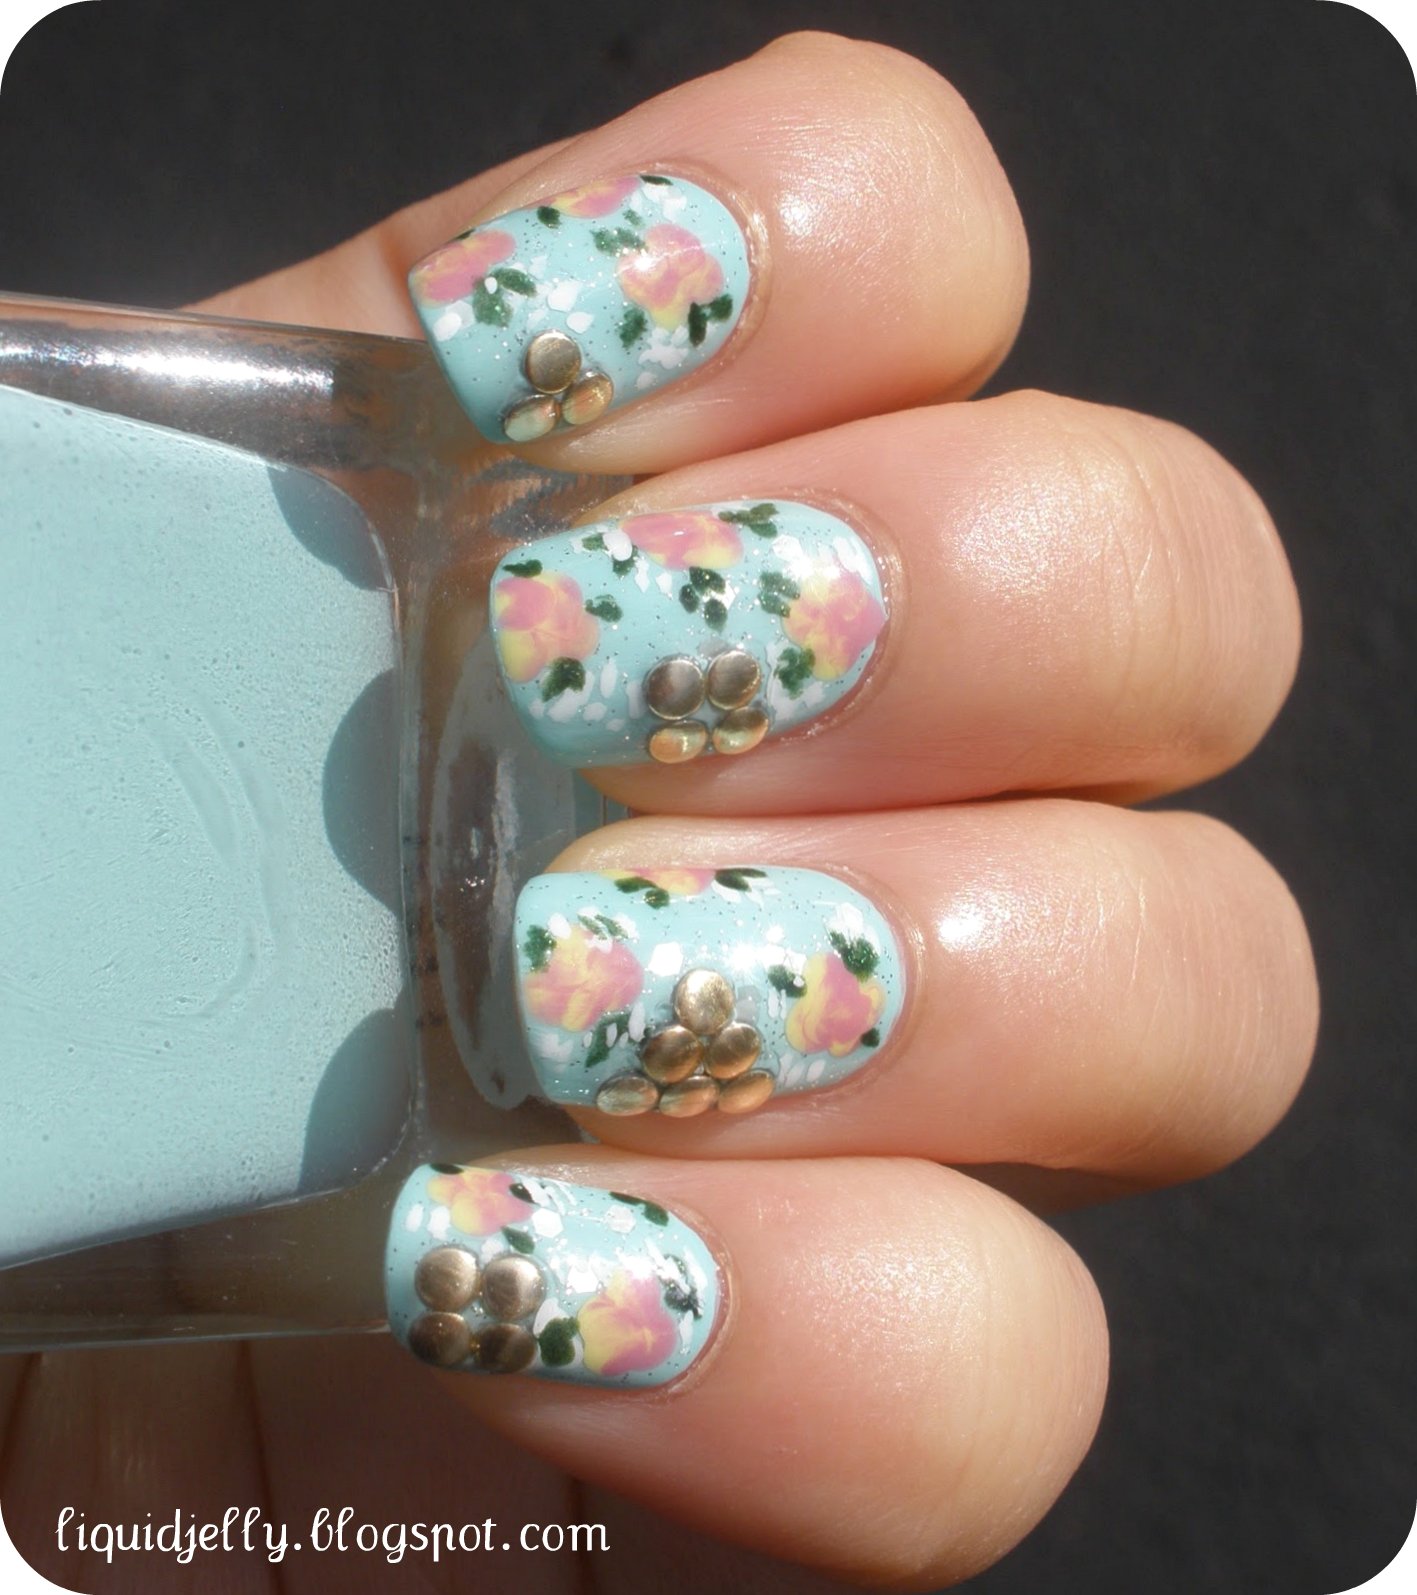
Floral Nail Art with BPS Studs


Hi all!  I know we're approaching winter, but I really wanted to do some floral nails.  So here they are.  I think this is my best set of floral nails yet.  And I just realized I always use a mint base color... I should change it up.  But this time I added studs!  Exciting, right?


For this look, I used Urban Outfitters Smush as the base color.  Then I layered one coat of OPI Don't Touch My Tutu! and Pirouette My Whistle over it to soften the mint.  For the flowers, I used OPI Sparrow Me The Drama and Dr.'s Remedy Youthful Yellow.  (Here's a tutorial on how to do the flowers.)  The leaves were done with Revlon Rain Forest.  I also added a spray of white flowers by dotting on Milani White On The Spot.  No tools were required for this look besides a bobby pin. :)
 

As for the studs, the ones I used are the 2mm round gold studs* from Born Pretty Store.  They come in the bag shown above, and as you can see, there are a lot of studs in there.  I actually love these studs a lot.  I prefer them over rhinestones and they don't lose their luster or bleed when topped with top coat.  They're also much flatter than rhinestones, so they don't come off easily or trigger the 'picking' instinct in me.  I already have a few other (more season relevant) designs in mind, so you'll be seeing these studs again. :P

You can find the studs on BPS for $5.90, and they carry a lot of other studs in different shapes and colors as well.  You can also use my code F10X31 to get 10% off your total! :)


That's it for today!  What do you think of this look?  Do you ever feel like wearing seasonally inappropriate nail art? -.-


Liz 
*The studs reviewed in this post were sent to me for my honest review.
Affiliate links are indicated with an * sign.
Please view my Disclosure Policy for more info.