 |
| Color used, L to R: Icing Written in the Stars, SinfulColors Tutu, Sinful Colors nail art polish in black, Milani HD |
Step 1: Apply your base color. I recommend light cremes or creme-jellies. I suggest you avoid shimmers unless it's subtle like in the color I used.
Step 2: Make three parallel dotted diagonal lines. You can do maybe 4, if you have bigger nails. I personally don't like too many lines since the black will start to over power the base.
Step 3: Repeat step 2, but in the opposite direction. Try to make big squares. Skip to step 7 to make simple quilted nails. Continue to step 4 for accent nails.
Step 4: Draw a heart. Haha, I guess that was a little simple. I used the black striping polish to draw the heart. There's room for error since we'll be coloring the heart in. So take your time shaping the heart. Just make sure the outer edge of the heart is crisp. I would draw the heart a little smaller than I did here so more of the quilt design shows through. I made it big for the tutorial. I also used the edge of my nails to make one of the curves of the heart.
Step 5: Color the heart in with the color of your choice. I used 2 coats of Milani HD to make it sparkly and diamond-like.
Step 6: Now go back in with the black striping polish and draw a border around the colored heart. Stay within the black outline you already drew, this way you can just worry about shaping the inside edge of the border. I hope this makes sense... Basically you are retracing the heart outline you drew in step 4.
Step 7: Pick out medium sized holographic glitter from a glitter polish and place them where the dotted lines intersect. (See tip below).
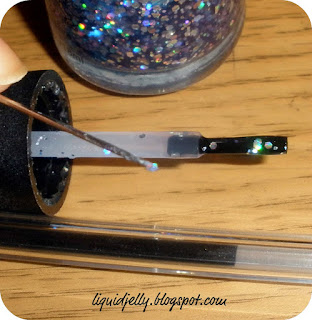
TIP: Here's how I pick out the glitter, since this can be a bit time consuming. I found this method the easiest.
Lay the brush on it's side after picking up some glitter with it. I stopped the cap from rolling with a pen. Then I took a needle and used the pointed tip to pick up a single glitter. Now you can see where the glitter is going when you place it, and it'll detach easily from the needle when you place it.
That's it! Pretty simple, right? It actually does not take long to do this mani at all. It's pretty easy and yields very cute results. Of course you can also use heart/bow stickers to embellish your quilted nails as well. I've done white bows before, and those were nice too. :)
Hope you enjoyed this tutorial! If you have any questions, please ask them in the comments below. I'm a little behind on replying to comments, but I try to answer questions right away. ^__^
Thanks for reading!
Liz


so cute, thank you for the tutorial :)
ReplyDeletesuper cute! i gotta try this soon thank for the tutorial!
ReplyDeleteI LOVE THESE! I'm so trying it out. Thanks for the tutorial =]
ReplyDeleteThanks for the tutorial, I really wanna try this it's so cute!
ReplyDeleteThanks for the tutorial. I'm definitely trying this out :-)
ReplyDeleteVery cute, thanks! I love your tutorials!
ReplyDeleteLove it! Great tutorial, Thanks!
ReplyDeleteI Love it!! very cute!!
ReplyDeletethis is so adorable hun, love the pattern you made xx
ReplyDeleteMy Blog: Boho Vanity
Thank you so much for doing this! I'm going out this weekend to find all the colors listed!
ReplyDeleteI love Tutu, and this tutorial is really cute!
ReplyDeleteo def have to try this...so cute
ReplyDeletethis is adorable, thank you so much for showing me how to attempt this
ReplyDeleteNo problem! :)
ReplyDeleteGlad you liked it! :)
ReplyDeleteNo problem! I'd love to see it if you do it! :)
ReplyDeleteThanks, I'm glad you like them! :)
ReplyDeleteNo problem! :)
ReplyDeleteThanks! :D
ReplyDeleteNo problem! I'm glad you found it helpful! :)
ReplyDeleteAw, thank you! :)
ReplyDeleteThanks! Definitely give it a try! :)
ReplyDeleteNo problem! I'm sure yours will turn out great! :)
ReplyDeleteI'm trying this today! I'm so excited
ReplyDeleteI did this mani yesterday, thank you for making this great and simple tutorial! :) Here is link for my attempt on this manicure, if you're interested ;) http://rakkauskynsiin.blogspot.fi/2012/11/sydanpaikkoja-tikkitakissa.html
ReplyDeleteThanks for sharing! I love how yours turned out! :D
ReplyDelete